Revisiting and Timelapse

In this module the user can define a list of points or rectangular regions of interest within the sample. Once this list is defined a certain sequence of actions (defined by a script) can be preformed in each point and region.

This Timelapse panel has two modes (for points or regions) and is divided into four parts:

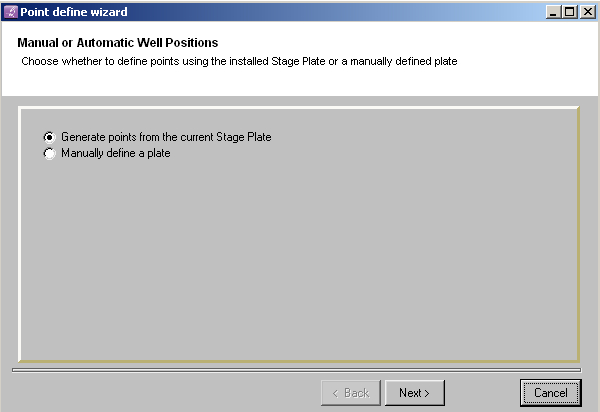
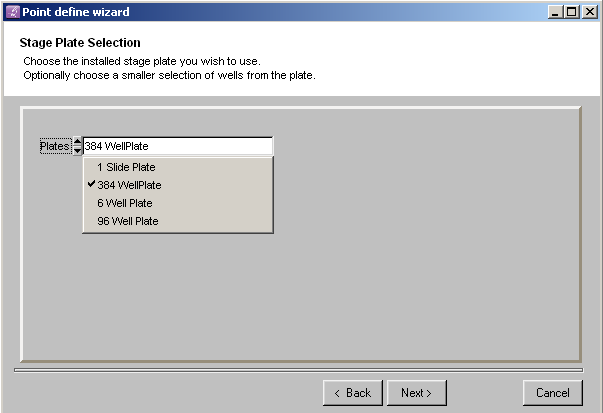
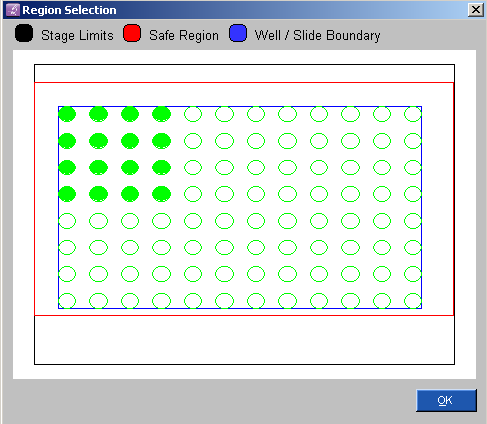
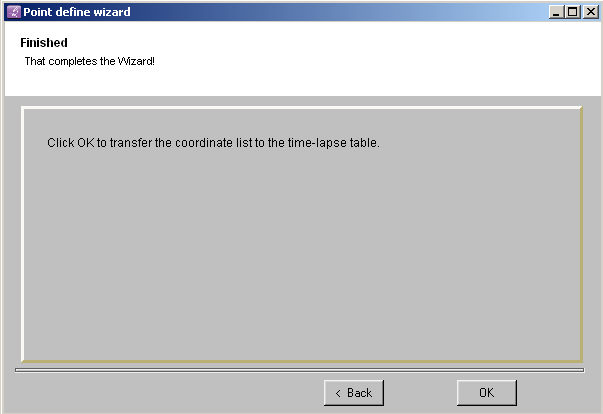
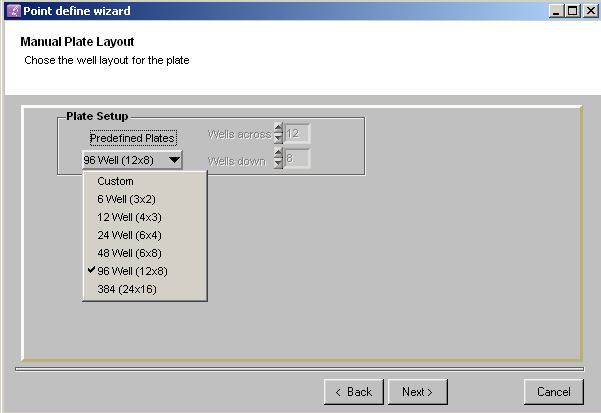
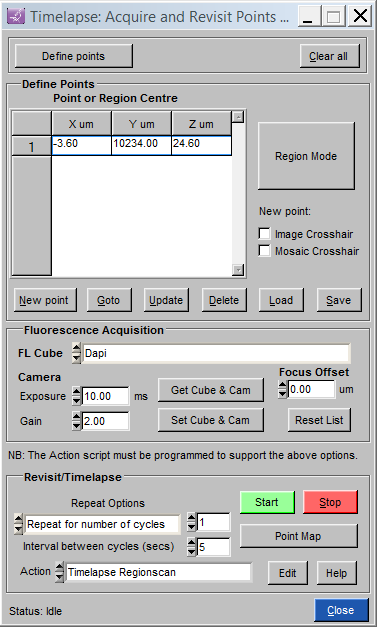
Define Points automatic wizard - A list of points (each with its x,y, and z co-ordinates) can be generated by using the "Define points" automatic Wizard.
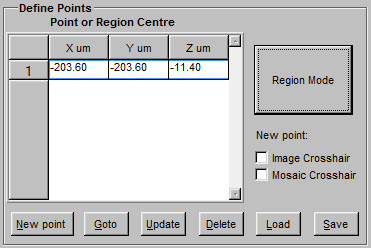
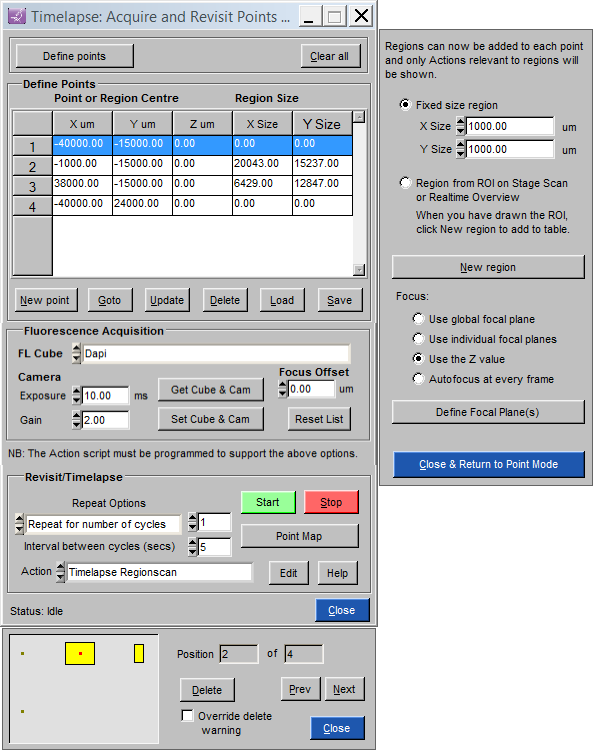
Define / Update Points Manually - A list of points (each with its x,y, and z co-ordinates) can be generated, edited, and updated manually. The tick boxes also allow new points to be created by clicking on the camera image or on a Realtime Overview or Stage Scan mosaic image.
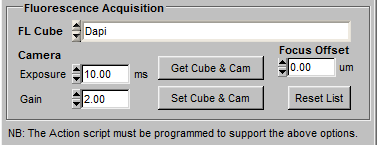
Fluorescence Acquisition - For fluorescence acquisition it is possible to setup a different camera exposure time and gain, as well as a focus offset, for each cube. Scripts that support this feature will appear under the "Fluorescence Acq"section of "Action" menu.
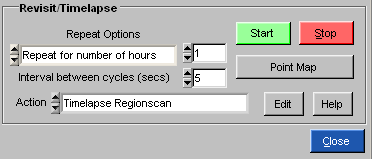
Revisit / Timelapse - Once a list of points is available one can choose to perform certain sequence of actions (defined by a scriptin the "Action" dialog box) at each point.  For example in each point we can specify to preform autofocus, take a Fluorescence image, and then take a FLIM image. Other actions can be specified in the Action dialog box using an appropriate script file.


Define points using the "Define points" wizard button


After pressing the "Define Points" button the following screen will appear.


Generate points from current Stage Plate - One should use this option if the sample (either a multi-well plate or glass cover slip) has been correctly defined in the stage plate section.
Manually define plate (Only to be used by advanced user)- One should use this option if one wants to use an unusual plate / scanning pattern.

If one chooses Generate points from current Stage Plate the list of points will be defined automatically by the software in the following way. 


Once a well plate is chosen, the following screen will appear.


One can choose whether to include the whole plate or choose a specific region of interest within it (i.e only choosing a number of wells) by highlighting the appropriate wells using the Shift button.


Next, the software will determine the correct focal plane so that the entire well plane is in the focal plane. For that purpose the software will move each of the four corner wells over the objective, before clicking "Define" make sure you are focused. Once the four corners have been recorded the software will move automatically to three random wells (before clicking "Next" again make sure you are focused).


Finally, the user can choose the scan direction and the start scan position.


Once the wizard is finished a list of points will be created and will be visible in the Define / Update Points part.

If one chooses to define manually the plate layout one has to choose the number of wells as well as the number of  rows and columns.


After clicking "Next" the Region Selection screen will appear and the wizard will continue.


Define / Update Points Manually
This function allows the user to manually add, update or load a list of points or regions from a file as well as to save them.


New point - A new point can be added by manually positioning the stage using the joystick and pressing "New point" button. Once a row of co-ordinates has been stored in this way it is possible to double click in a number cell and manually edit the value.
Goto - Sends the stage and Z drive to the point defined.
Update - highlighting a row and pressing 'Update' will over-write the row with current stage position.
Delete - Removes the selected row from the table.
Load - loads a list of points of interest.
Save - saves the list of points of interest.
Clear all - clears the list of points of interest.
New Point: Image Crosshair - uses the cross hair function on the image (seen on the screen) to add entries to the list.
New Point: Mosaic Crosshair - uses the cross hair function on a Stage Scan or Realtime Overview mosaic image to add entries to the list.
Region Mode - In Region Mode the panel is extended to reveal the X and Y size of the region and options for selecting regions:


In Region Mode only region enables scripts will appear in the Action menu.
New Region - Adds a new region to the table, either of a fixed size, centred on the current stage coordinates, or from a rectangle drawn using the ROI (region of interest) tool on a mosaic image. Focus - Defines how the focus should be maintained accross the region. Either by using a single, global, focal plane, or using individual focal planes defined for each region (You must click "Define Focal Plane(s)" to setup the focal planes after all the regions have been entered into the table). The focus can also be held at the Z value in the table across each region, or you can force the system to use the saftware autofocus at every single frame in the acquisition.
You will see that points and regions can exist in the same table (points have zero size). The "Region" enabled scripts will acquire a single frame at a point.


Fluorescence Acquisition


For fluorescence acquisition it is possible to setup a different camera exposure time and gain, as well as a focus offset, for each cube. Scripts that support this feature will appear under the "Fluorescence Acq" section of "Action" menu.
FL Cube - Choose the fluorescence cube for which you wish to view or edit the parameters.
Camera Exposure - Set the camera exposure to use when the selected cube is used for imaging.
Camera Gain - Set the camera gain to use when the selected cube is used for imaging.
Focus Offset - Set the focus offset to be added top the Z value in the table when the selected cube is used for imaging.
Get Cube & Cam - A convenient button that gets the current values for exposure and gain from the camera and inserts them into the Exposure and Gain fields of this panel for the cube currently in use.
Set Cube & Cam - A convenient button that takes the current values for cube, exposure and gain from this panel and sends them to the microscope. This make checking the settings that you have easy.
Reset List - This button reloads the list of cubes into the menu and resets the values to default values.

Revisit / Timelapse

Once a list of points is available one can choose to perform certain sequence of actions (defined by a script in the "Action" dialog box) at each point.  For example in each point we can specify to preform autofocus, take a Fluorescent image, and then take a FLIM image. Other actions can be specified in the Action dialog box using an appropriate script file.


Repeat Options - number of cycles / time to revisit each point on the list.
Interval between cycles - interval between each cycle through the list of points. If it takes longer than the interval to go through the list, the sequences will be performed as fast as possible.
Start - starts the sequence.
Stop - stops the sequence.
Point Map - opens a dialog box where a map of the points in the list are shown.
Edit - edits a script
Help - opens this help file
Close - closes the dialog box.
Point Map - Opens the point map panel (below).

Prev - stage goes to previous position in the list of points.
Next - stage goes to next position in the list of points.
Delete - point is deleted from the list of points.
Override delete warning - if this option is chosen no delete warning is shown before deleting a point from the list.