Linking a spreadsheet with a map
In this practical you will:
You will need:
- Your zip disk containing data used in the practicals so far
- A computer with internet access
- MapInfo software (at least version 5.5)
- Notebook with information on tree species and other inventory data collected during fieldwork.
- Microsoft Excel software.
|
|
|
|
Click here with the right
button of your mouse. A menu will pop up in which you should select
Save Target As.... Save the file
Species_composition.xls to the Data folder on
your zip disk. This file contains a list of compartment numbers, planting dates
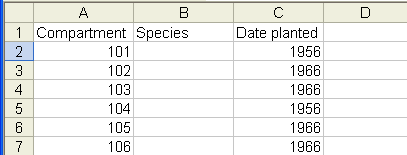
and a column for you to fill in the species composition data. Open Species_composition.xls in Microsoft Excel
and then enter your species data in column B. Use the following categories for
mixed stands:
- Semi-natural deciduous woodland
- Mixed broadleaf/conifer plantations
- Mixed broadleaf plantations
- Mixed conifer plantations
When you have finished entering all your data, save your file either by selecting File and Save or by clicking the Save button on the toolbar
 . . Make a note of the range of cells that are filled with data (excluding the column titles), e.g. A2 to C56. You will need this information later when you open the table in MapInfo. Close the file Species_composition.xls by selecting File and Close.
|
|
Open Little Wittenham.TAB and compartment_map.TAB in the
same mapper window in MapInfo. Now select File and Open Table... Under Files of type select Microsoft Excel. Your file
Species_composition.xls should now be visible. In Preferred View: select Browser. Finally select compart_info.xls and click Open. In the Excel Information dialogue box under Named Range select Other... and enter the range of data of the form
(Sheet1!A2:C56). MapInfo is quite clever and can work out which cells have information in them. But it will want to
include the column titles too. You won't need to change much in range it suggests, probably simply change A1 to A2
to exclude the column titles. Then click OK.
|
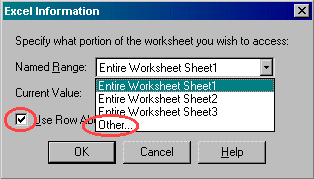 |
Back in the Excel Information dialogue box, click in the check box next to Use Row Above Selected Range for Column Titles so that a tick appears and then click OK.
A new window will appear in MapInfo with a table in a browser window that should display the information you entered in your excel workbook. You will have generated a MapInfo table Species_composition.TAB but if you want to edit the table in any way in MapInfo you need to save a copy of it. To do this select File, Save Copy As..., choose
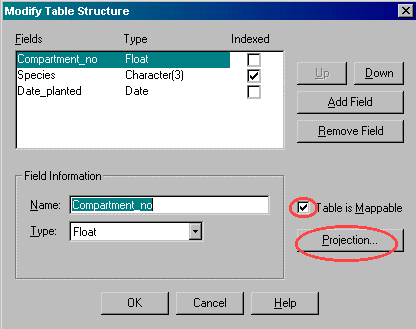
Species_composition and click Save As.... Save the file in the "Data" folder renaming it compart_info_now.TAB. Click Save. Close the table Species_composition.TAB by selecting File and Close Table... It is best to use this slightly pendantic method to close each table since it is possible to have a table open more that once (in browsers, mappers etc). Simply clicking on the "x" button in the top right hand corner of the window will not close a MapInfo table completely. Open the new table you have copied, compart_info_now.TAB, in Preferred View select Browser. Now select the Table menu, Maintenance, then Table Structure. Select compart_info_now and click OK. In the Modify Table Structure dialogue box click in the check box Table is Mappable which will cause a new button to appear: Projection... select this and choose the same projection as for the OS map and the paper map, i.e. British Coordinate Systems and British National Grid, then click OK. In the Modify Table Structure box click OK. Now you are ready to associate polygons with each compartment by manual geocoding.
|
|
|
|
In order to see both the mapper window and the browser window you can select the Window menu and Tile Windows. You can move the edges of the windows to resize them and to display the browser and mapper as you wish. You will need to resize the maps in the mapper window so that you can clearly see the area of Little Wittenham wood.
You will need to open the table compart_info_now.TAB again in the mapper window. To do this select File, Open Table..., and select compart_info_now.TAB with Preferred View selected as Current Mapper.
|
|
Now click on the title bar of the mapper window so that it is selected.
|

|
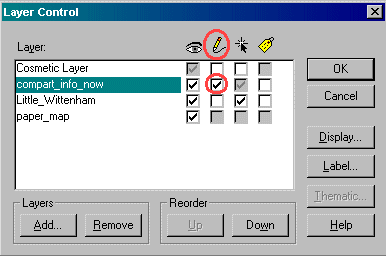
Select the layer control toolbar button and make sure compart_info_now is the top layer (but below Cosmetic Layer) and make the compart_info_now editable by clicking in the selection box under the pencil. Then click OK.
|
|
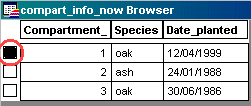
- Now click on the title bar of the browser and select the 1st compartment. The white box next to compartment 1 should be filled black. An Info Tool window may pop up with information regarding the compartment selected.
|
|
Next click on the title bar of the mapper window again. In the drawing toolbar select the polygon button
 . Then trace out the boundary of
this compartment in the mapper window, based on the outline you can see on the
registered raster image. To trace the boundary, click on the first corner, trace along the first edge, then click at the second corner, trace along to the 3rd corner and so on until you have completed the boundary and returned to the first point. MapInfo will highlight the polygon when you are finished. . Then trace out the boundary of
this compartment in the mapper window, based on the outline you can see on the
registered raster image. To trace the boundary, click on the first corner, trace along the first edge, then click at the second corner, trace along to the 3rd corner and so on until you have completed the boundary and returned to the first point. MapInfo will highlight the polygon when you are finished.
|

|
Repeat the procedure for the second compartment. Click on the browser title bar, select the second compartment entry, click on the mapper title bar, select the polygon button on the drawing toolbar and trace out the compartment boundaries.
Save the table, by choosing File, Save Table... and selecting compart_info_now.
| |
Hint: MapInfo has a handy snap tool which helps you align your compartment boundaries. If you want the edges of the compartments to match up exactly, press the S key on the keyboard. One of the grey boxes in the tool bar at the bottom of the screen will be filled in as follows:  . When you move the mouse within a certain tolerance of a nearby line or vertex, the cursor will change into a large dashed cross. Clicking at this point will select a vertex for your new compartment that is on the boundary of the neighbouring one. . When you move the mouse within a certain tolerance of a nearby line or vertex, the cursor will change into a large dashed cross. Clicking at this point will select a vertex for your new compartment that is on the boundary of the neighbouring one.
|  |
Continue until all the compartments have polygons associated with them. - Finally, make sure you have saved the table. Then save the workspace as compart.WOR
|
|
|
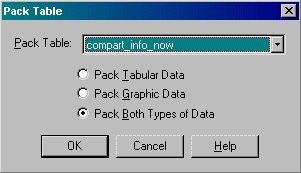
If by mistake you forget to click on a new compartment in the browser window before drawing the compartment in the mapper window unfortunately there is no way of linking this compartment to the row in the browser. A new row will appear at the bottom of the browser. To get rid of the polygon in the mapper window click on the select tool and select the compartment you wish to delete. Then choose the Edit menu and Clear. In the browser window the row will now appear greyed out. In order to get rid of this unnecessary row you have to pack the table. Select the Table menu, then Maintenance and Pack Table... This will produce the Pack Table dialogue box. Check that compart_info_now is chosen in the Pack Table: entry and you want to Pack Both Types of Data. Click OK. MapInfo will prompt you to save changes before closing the table. Click on Save. As you have made changes to the table, MapInfo will close all copies of the table. You will need to open it in browser and mapper form again. Don't forget to make sure you're editing the correct table before you start drawing again.
|
|
Top of page
|
