Microscope

The main microscope panel provides the most commonly used controls. More options are available via the components tab where individual hardware elements can be controlled. The configure tab offers some calibration possibilities.

Components
Configure
Help


Microscope


Mode
- Choose the microscope mode here. Once a mode is chosen the path, camera settings, shutter settings and cube (to some extent) will be chosen automatically.
Fluorescence - in this mode we illuminate the sample with the lamp using Epi-illumination (light is passed from below through the objective lens and then onto the sample), the light goes through a fluorescence cube and is imaged onto the camera.

Bright Field
- in this mode we illuminate the sample with either room lights or the LED array using Transillumination (bright field illumination of a sample by transmitted light), the light goes through a fluorescence cube and is imaged onto the camera.

Laser Scanning
- this is the mode used for laser scanning fluorescence and FLIM measurements. In this mode we use the laser for excitation, the light goes through a fluorescence cube (normally done with UV - 2A) and the detection is done with the PMT detector with the correct filter set in front of it.

When the Laser Scanning is chosen the following two control panels pop up.

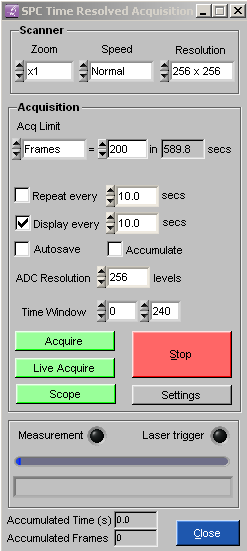
SPC Time Resolved Acquisition

Scanner - advanced scanner settings can be chosen in the Components >> Hardware >> Scanner.
Zoom - Sets the area to be scanned or to park the beam.
Speed
-  Sets the speed of the scanners.
Resolution -  Sets the resolution of the resulting image.

Acquisition
Acq limit - Sets the number of frames or seconds to acquire and accumilate data for.
Repeat every
- Repeat acquisition every (number) of seconds.
Display every - Displays image every (number) of seconds.
Autosave - Autosaves the acquired image/s.
Accumulate - Accumulate data from successive acquisitions.
ADC Resolution - Refers to the number of time resolved bins.
Time Window -  For image display only, the saved raw data is not affected. Selects the range of time bins used.
Acquire - Scans and acquire an image.
Live Acquire - Fast acquisition.
Scope - Park the beam and show a trace.
Stop - Stops the acquisition.
Settings -  Opens the advanced settings dialog box.
Measurement - Light is on when a scan is in progress.
Laser trigger - Indicates that the hardware has good trigger pulses from the laser.
Progress Bar - Indicates the progress of the current acquisition.
Accumulated time - Amount of time acquisition has been accumulated.
Accumulated Frames - Accumulated number of frames.
Close -  Closes the dialog box.


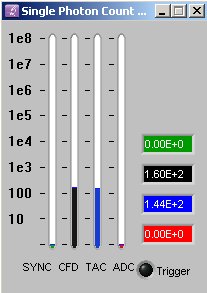
Single Photon Count...
Detection rates (accepted values):
SYNC - Laser trigger pulses  (laser rep rate, 4e7 or 8e7)
CFD - Constant Fraction Discriminator (<1e5 during scan)
TAC - Time to Amplitude Converter (<1e5 during scan)
ADC - Analog to Digital Converter (<1e5 during scan)
Trigger - Indicates that the hardware has good trigger pulses from the laser.


Cube - there are currently three fluorescence cubes to choose from.

Path -
this refers to the detection path.
Laser scan - when the laser scanning mode is chosen the detection is done by the PMT.
Colour camera - not yet available.
Camera - when the Fluorescence or Bright Field mode is chosen the detection is done by the camara.
Path4 - not yet available.


Camera settings - these controls are duplicated from the camera control panel.

Live - takes repeated snapped images.
Exp. - exposure time.
Snap - snaps an individual image.
Binning - pixels in the vertical and horizontal direction are combined. For example 2 x 2 means that that 4 pixels from a 2 x 2 square are combined to a single pixel. The result of binning is that (per pixel) the intensity is increased while the resolution is decreased.


Stage

The stage section gives an updated display of the stage position.
Store XYZ -  the co-ordinates displayed will be stored to memory.
GoTo XYZ -  will drive the stage to the stored in Store XYZ.


Joystick

Joystick - joystick is enabled and the right LED will turn red.