
An introduction to raster and vector files
On this page you can learn more about:
Vector files |
|
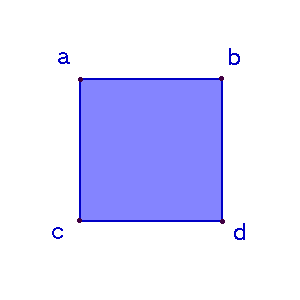
| The files that you used in Practical 1 were vector files. That means that information about points, lines and polygons is stored in terms of their co-ordinates. In the example opposite a vector file would describe a blue square by locating the corners a, b, c and d and filling the polygon with the colour blue. In a vector file every object has a location. This is very useful for GIS analyses because it is possible to get information such as how far apart two objects might be or whether two areas overlap. |
 |
Raster files |
|
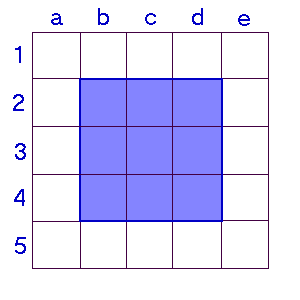
| In a raster file the entire study area is divided up into a regular grid. Each grid square or pixel is assigned a value the information is stored pixel by pixel. In the example opposite a raster file would describe the blue square by listing which pixels were coloured blue (rows 2 to 4 and columns b to d). In a raster file every location has a value. Raster files are very useful in GIS for mapping how a continuous variable (such as altitude) varies over space. |
 |
| When you scan a paper map and create an image file (such as a
*.gif or *.jpg file), the image is stored in raster format. You can use the
image in MapInfo by registering its exact spatial location. To do this you need
to know the precise co-ordinates of at least four points on the image. MapInfo
will use these control points to locate the image correctly. You can open vector
and raster images at the same time. However, remember that you will only be able
to select and work with map objects in a vector image. Raster images do not
contain map objects, just a grid of pixels each with its own attribute value(s).
The picture opposite shows a small section of a raster image of the Little Wittenham compartment map. If you look carefully you can see how it is composed of black, grey and white pixels. |
|
| You can create a vector image from a raster image by tracing the outline of objects that you need using MapInfo's drawing tools. MapInfo places a cosmetic layer over an open raster image. You can draw on the cosmetic layer without affecting the image underneath. You can then save your drawing as a new vector image. | |
| You are now ready to do Practical 2 |

| Web page designed and written by Nick Brown. Last updated on 14th February 2002. Any comments & suggestions to nick.brown@plants.ox.ac.uk. |