|
|
|
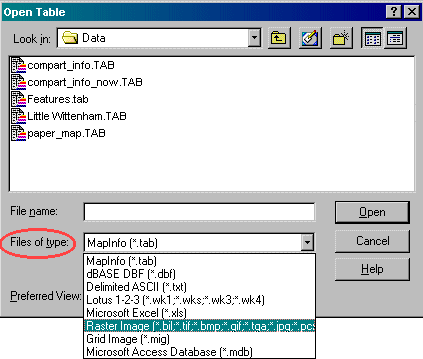
- Now you will need to open the raster image in MapInfo. Select the File menu and then Open table... As an alternative you can use the Open Table button on the toolbar
 . In the available files
compartment_map.gif will not be displayed as MapInfo by default will only show files with a .TAB extension, i.e. MapInfo tables. In order to open a scanned in picture you need to tell MapInfo what sort of file you are trying to open. In the Open Table dialogue box under types of files click on the drop down arrow and select Raster image.
compartment_map.gif should now be displayed. To open compartment_map.gif over the top of the OS map in the Preferred View option select Current Mapper. Finally select
compartment_map.gif and click Open. . In the available files
compartment_map.gif will not be displayed as MapInfo by default will only show files with a .TAB extension, i.e. MapInfo tables. In order to open a scanned in picture you need to tell MapInfo what sort of file you are trying to open. In the Open Table dialogue box under types of files click on the drop down arrow and select Raster image.
compartment_map.gif should now be displayed. To open compartment_map.gif over the top of the OS map in the Preferred View option select Current Mapper. Finally select
compartment_map.gif and click Open.
|
 |
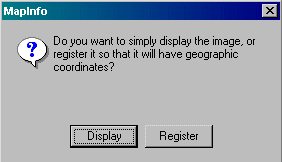
A window will open asking you whether you would like to display or register your image. Select Register. This will enable you to choose a coordinate system and link the
raster image with the OS map.
|
|
An Image Registration dialogue box will open. Firstly click on Projection... to instruct MapInfo which coordinate system to apply to
compartment_map.gif. In the Choose Projection dialogue box under Category select British Coordinate System and under Category Members select British National Grid. Click OK.
|
|
Back in the Image Registration box, click New. If you move the mouse over the image of the paper map then a cross will appear instead of an arrow.
Scroll across the image until you can see your first control point, for example the top left hand corner of Little Wittenham wood. The Add Control Point dialogue box will open. You can rename the point if you wish or leave it as "Pt. 1". Then enter Map X and Map Y values for the point. Click OK. Select
3 other points in the same way. You can use the scroll bars to view different parts of the map, and also use the "+" and "-" buttons to zoom in and zoom out of the map. When you are finished selecting points click OK.
|

|
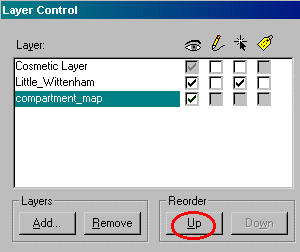
An new layer should open in the current mapper showing the hand drawn map over the OS map. If not, then you will need to bring
compartment_map.gif to the top layer. On the Main toolbar click the Layer Control button
 . In the Layer Control dialogue box select compartment_map and in the Reorder section click Up. Then click OK. . In the Layer Control dialogue box select compartment_map and in the Reorder section click Up. Then click OK.
|
|
Now that you have registered compartment_map.gif you will have created the file compartment_map.TAB in the same folder as
compartment_map.gif, in this case in the "Data" folder on your zip disk. From
now on if you want to open this raster image in MapInfo you simply open the MapInfo table with the .TAB extension. There is no need to digitise or register the image again. You must keep all the files relating to compartment_map.gif together in the same folder as compartment_map.TAB.
The TAB file will refer for information to compartment_map.gif and if you put the files in different places MapInfo will not know where to look. Save the workspace as compartment_map.wor. Instructions for saving a workspace can be found in Practical 1. In the next section you will need to
convert the hand drawn map into a vector map that can be used in a GIS.
|
|
